
After hosting a successful event, capturing those precious moments through photos is essential to cherish the memories created. However, sharing these moments with your guests is equally important. When it comes to sharing event photos effortlessly, Evite emerges as a popular choice due to its user-friendly interface and convenience. In this step-by-step guide, we will delve into the process of uploading photos to Evite after your event, ensuring you can effortlessly share the joy with all attendees. From selecting the right photos to customizing the album, we will cover all aspects to help you master the art of uploading photos to Evite seamlessly.
Overview of Evite and Its Photo Uploading Feature
Evite is a popular online platform that allows users to create and send digital invitations for various events and gatherings. Apart from sending invitations, Evite also provides users with the option to upload and share photos after the event has taken place.
Step-by-Step Guide to Uploading Photos on Evite
After hosting an event, follow these steps to upload photos to your Evite invitation:
- Log in to your Evite account – Access your account using your login credentials.
- Select the event – Choose the event for which you want to upload photos.
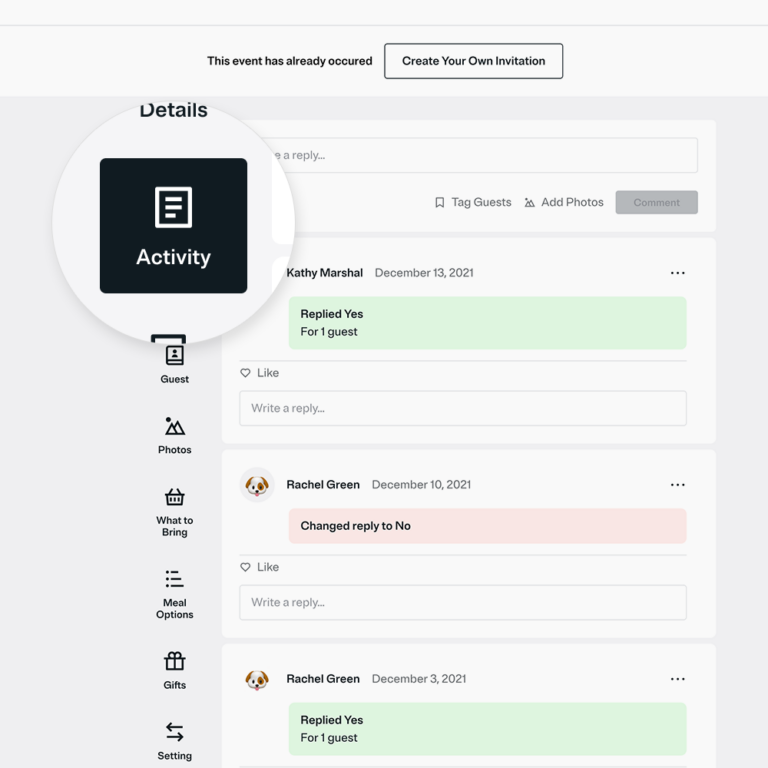
- Click on the “Add Photos” button – Look for the option to add photos within the event invitation page.
- Upload your photos – Choose the photos you wish to share and upload them to your event page on Evite.
- Save changes – Once the photos are uploaded, remember to save the changes to ensure they are visible to your guests.
Benefits of Using Evite’s Photo Uploading Feature
Utilizing Evite’s photo uploading feature offers several advantages:
- Preserve Memories – Easily store and share event photos with attendees.
- Enhance Interaction – Encourage guests to engage post-event by viewing and commenting on shared photos.
- Convenience – Avoid the hassle of individually sending photos by utilizing Evite’s centralized platform.

Preparing Your Photos for Upload
Before uploading your event photos to Evite, it’s essential to make sure they are properly optimized for viewing and sharing. Follow these steps to prepare your photos for upload.
Organize Your Photos
Start by organizing your photos into folders based on the event or theme. This will make it easier to locate and upload the desired photos.
For example, if your event was a birthday party, create a folder named ‘Birthday Party 2022’ and place all related photos inside.
Resize and Compress Images
Large image files can slow down the uploading process and may cause issues with viewing. Resize your photos to a suitable dimension, typically between 800-1200 pixels on the longest side, to maintain quality while reducing file size.
Consider using image compression tools like TinyPNG or JPEGmini to further reduce file size without compromising image quality.
Renaming Your Photos
Give your photos descriptive filenames that include keywords related to your event to improve SEO and make them more searchable on Evite.
For instance, rename a photo from ‘IMG_1234.jpg’ to ‘Birthday-Party-2022-Cake-Cutting.jpg’ for better organization and SEO visibility.
Adding Alt Text
When uploading your photos to Evite, make sure to add alt text that describes the image content. This not only helps visually impaired users but also improves SEO.

Step 1: Logging into Your Evite Account
To upload photos to Evite after your event, you first need to log into your Evite account. Visit the Evite website and locate the “Sign In” option at the top right corner of the page.
Accessing Your Account
Enter your registered email address and password in the designated fields to access your account. If you have forgotten your password, you can click on the “Forgot Password?” link to reset it.
If you do not have an Evite account, you will need to create one by clicking on the “Sign Up” option and following the prompts to register.
Navigating to Your Event
Once logged in, navigate to the “My Events” section of your account dashboard. Here, you will find a list of all the events you have created or RSVP’d to.
- Select the event for which you want to upload photos by clicking on its title or thumbnail.
- Within the event page, look for the option to upload photos, usually located in the event details or photo gallery section.
Step 2: Accessing the Event Gallery
Once your event is over, accessing the event gallery on Evite is a simple process that allows you to relive the special moments captured by photos.
Logging In to Your Evite Account
To access the event gallery, start by logging in to your Evite account using your credentials. Navigate to the Evite website and enter your email address and password.
If you don’t have an account yet, you can easily create one by clicking on the “Sign Up” option and following the on-screen instructions. Make sure to verify your email to activate your account.
Finding the Event Gallery Section
After logging in, locate the event for which you want to view the gallery. Click on the event name to open it, and then look for the “Gallery” tab or option within the event page.
This tab will lead you to the event gallery, where you can browse through all the photos shared by your guests during and after the event.
Step 3: Uploading Photos to the Event
After your event, sharing the memories with your guests is a beautiful way to keep the experience alive. Uploading photos to your Evite event page is simple and ensures everyone can relive those special moments. Follow these steps to effortlessly upload photos to your event.
Create an Album
To get started, log in to your Evite account and locate the event for which you want to upload photos. Navigate to the event page and look for the option to create a new album specifically for this event. Name the album something relevant to the occasion.
Once the album is created, you can start adding photos by simply clicking the ‘Add Photos’ button.
Upload Photos
Select the photos you wish to upload from your device. Make sure the photos capture the essence of your event and highlight the best moments. It’s always a good idea to include a variety of photos to showcase the different aspects of the event.
- Organize your photos: Sort the images in a logical order to create a visual story of the event.
- Upload in batches: If you have many photos, consider uploading them in batches to avoid overwhelming your guests with a large album.
Step 4: Organizing and Editing Photos
After your event, it’s crucial to organize and edit the photos before uploading them to Evite to ensure they look their best.
Using Photo Editing Tools
Consider using photo editing tools like Adobe Photoshop or Lightroom to enhance the quality of your photos.
You can crop, adjust brightness and contrast, apply filters, and more to make your photos pop.
Creating Folders for Easy Access
It’s a good idea to create folders on your computer to organize your event photos efficiently.
- Label folders by date or event name to easily locate specific photos later on.
- Separate photos based on different activities or moments during the event.
Tips for Enhancing Your Event Photos
Enhancing your event photos can elevate the overall quality of your memories and make them more enjoyable to share with your guests and on social media platforms.
1. Lighting is Key
Good lighting can make a significant difference in the quality of your photos. Try to take pictures during the day or ensure that the venue has proper lighting for your event.
2. Capture Candid Moments
Candid shots often turn out to be the most memorable. Encourage your guests to act naturally and capture those unposed moments that reflect the true essence of the event.
3. Use Props and Decorations
Props and decorations can add a fun and festive touch to your photos. Incorporate themed props or backdrops to make your event photos more engaging and unique.
4. Edit and Enhance
After the event, take some time to edit and enhance your photos. You can use photo editing tools or apps to adjust the brightness, contrast, and colors to make your photos more vibrant and appealing.
5. Group Shots and Selfies
Group shots and selfies are great for capturing the togetherness and fun moments of your event. Encourage your guests to take group photos and selfies to create lasting memories.
Sharing the Event Photos with Guests
After your event, you can easily share the memorable photos with your guests by uploading them to Evite. Sharing event photos allows guests to relive the special moments and create a lasting memory of the occasion.
Uploading Photos to Your Evite Event Page
To start sharing event photos, log in to your Evite account and navigate to the specific event page you want to update. Look for the “Add Photo” option and click on it to upload your photos from the event. Make sure to select high-quality and meaningful pictures that capture the essence of the gathering.
You can enhance the photos by adding captions or short descriptions to provide context and evoke emotions associated with the event.
Customizing Photo Gallery
Once you have uploaded the photos, organize them into a photographic gallery on your Evite event page. Arrange the pictures chronologically or based on themes to create a visually appealing display for your guests to enjoy.
Add a personalized touch by curating the photos in a way that tells a story of the event, from the beginning to the end. This engages the viewers and allows them to reminisce about the shared moments.
Frequently Asked Questions
-
- What is Evite?
- Evite is an online platform that allows users to create and send digital invitations for events and gatherings.
-
- Why is uploading photos to Evite after your event important?
- Uploading photos to Evite after your event allows you to share memories with your guests and keep them updated on the event’s highlights.
-
- How can I upload photos to Evite after my event?
- You can upload photos to Evite by logging into your Evite account, accessing the event page, and following the prompts to upload and share photos.
-
- Can I upload photos to Evite from my mobile device?
- Yes, you can upload photos to Evite from your mobile device by using the Evite mobile app or accessing the Evite website through your mobile browser.
-
- Are there any restrictions on the size or format of photos I can upload to Evite?
- Evite typically supports common image formats like JPG, PNG, and GIF. It’s recommended to check the specific guidelines on the Evite platform for the best uploading experience.
-
- Can I customize the photo album layout on Evite?
- Yes, Evite provides options to customize the photo album layout with features such as adding captions, rearranging photos, and choosing different display styles.
Closing Thoughts
Mastering the art of uploading photos to Evite after your event is now within your reach. By following our step-by-step guide, you can effortlessly preserve and share the memories of your special occasions with your guests. Remember, the key is to organize your photos, create an album, and share it with your attendees to relive the moments together. Evite provides a user-friendly platform that simplifies the process of post-event photo sharing, allowing you to connect and cherish the memories seamlessly. So, next time you host an event, confidently navigate through the upload feature on Evite and make your celebrations even more memorable.